
Boat Lift Installation and Maintenance Guide for Lasting Performance
Updated: Oct 6
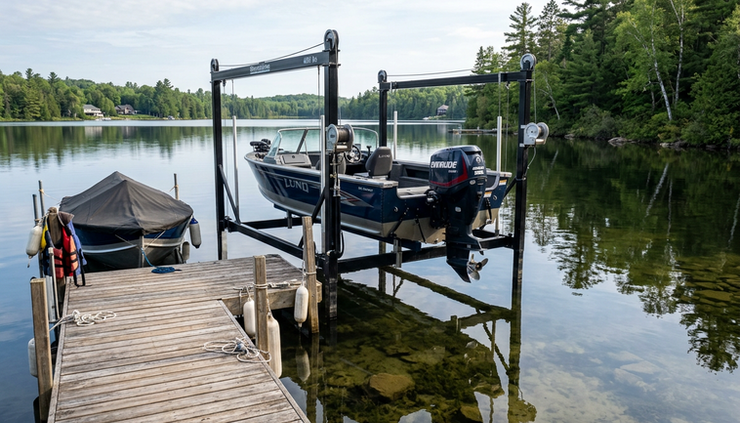
A boat lift protects one of the biggest investments at the dock, but only when it is installed correctly and maintained on a regular schedule. A poorly leveled lift can strain cables, twist the frame, and make loading harder. A neglected lift can corrode, bind, or fail when it is carrying thousands of pounds.
The good news is that most problems are preventable. Careful site selection, solid leveling, routine cleaning, and early troubleshooting go a long way toward keeping a lift safe and dependable. This guide covers the Boat-lift installation and maintenance basics every owner should understand before setting up a new lift or caring for an existing one.
Start with the right location and setup plan
A boat lift works best when the site matches the lift, the boat, and the water conditions. Before setting posts or assembling the frame, take time to check the dock area from several angles.
The best location gives the boat a straight path onto the lift. Sharp turns, shallow approaches, and strong crosscurrents make loading more difficult. The lift should also sit where the water stays deep enough through normal seasonal changes. If the water level drops often, the bunks or cradle may sit too high for easy loading.
Check these site factors before installation:
Water depth
Measure at both low and typical water levels. The boat needs enough clearance to float over the cradle before lifting.
Bottom conditions
Firm sand, gravel, or packed clay can support many freestanding lifts. Soft muck or shifting silt may require pads, longer legs, or another support method.
Wave and wake exposure
A protected cove is easier on the lift than an open shoreline with heavy wakes. More exposure may call for stronger bracing or a heavier-rated system.
Dock access
The lift should allow safe walking space, easy tie-off points, and access to controls.
Boat weight and dimensions
Use the boat’s full operating weight, not just the dry weight. Fuel, batteries, gear, water, and accessories all add load.
Choose a lift rated above the real working weight of the boat. Staying within the limit is not enough if the boat is loaded unevenly or exposed to rough conditions. A margin of safety helps protect cables, pulleys, motors, and the frame.
Before work begins, review local rules. Some lakes, marinas, and homeowner associations limit lift types, canopy height, electrical connections, or dock modifications. If the lift uses shore power, a qualified electrician should handle the wiring and ensure the system uses proper marine-rated components and ground-fault protection.
Install the lift with careful leveling and alignment
Most boat lift problems begin with a simple issue: the frame was not square, level, or aligned with the boat. Even a small lean can place extra stress on one cable or corner.
Follow the manufacturer’s instructions for the exact model. The steps below describe the general process for many common lifts.
Assemble the frame on stable ground
Lay out all parts before assembly. Confirm that bolts, pulleys, bunks, guides, cables, and hardware match the manual. Tighten hardware according to the manufacturer’s instructions, but avoid over-tightening parts that need to pivot or move.
If the lift is assembled in sections, keep the frame square as it comes together. Measure diagonally from corner to corner. Equal diagonal measurements usually mean the frame is square. If one diagonal is longer, adjust before tightening everything fully.
Place the lift in the selected location
Move the lift into position using safe equipment and enough help. A boat lift can be awkward and heavy, especially in water. Do not stand under suspended sections, and avoid lifting in windy or rough conditions.
For freestanding lifts, set the legs or pads evenly on the lakebed. Make sure each foot has solid contact. If one corner sinks, the lift can twist after the boat is loaded.
For piling-mounted or dock-mounted systems, confirm the support structure is sound. Rotten wood, loose fasteners, cracked concrete, and leaning pilings should be repaired before the lift is attached.
Level the lift from front to back and side to side
Leveling is one of the most important installation steps. Use a quality level, laser level, or water level to check the frame in both directions.
A level lift helps:
Keep cable tension even
Support the hull correctly
Reduce wear on pulleys and bearings
Make loading and unloading smoother
Prevent the boat from drifting hard against guides
Adjust the legs, pads, mounts, or brackets until the lift sits evenly. Recheck after the first few uses because the bottom may settle under load.
Set bunks and guides for the hull
Bunks should match the hull shape and support the boat along strong areas, often near stringers or recommended support points. Poor bunk placement can create pressure points or leave the boat unstable.
Set the bunks so the boat centers itself as it comes in. Side guides should help with alignment, not squeeze the hull. Leave enough clearance for normal movement, especially in wind or current.
After the first lift, inspect how the boat sits. The weight should look balanced. If the bow sits too high, the stern hangs low, or one side carries more load, adjust the bunks before regular use.

Build a simple maintenance routine
A boat lift lives in a tough environment. Sun, water, wind, algae, sand, salt, insects, and changing temperatures all wear on the system. Regular maintenance keeps small issues from becoming expensive repairs.
Use a routine based on how often the lift is used and the conditions around it. Saltwater and heavy-use lifts need more attention than freshwater lifts in protected locations.
Inspect before and during the season
A quick visual inspection takes only a few minutes. Look over the lift before heavy use, after major storms, and at regular intervals during the boating season.
Check these parts closely:
Cables for fraying, kinks, rust, or broken strands
Pulleys and sheaves for smooth movement
Bolts, nuts, and pins for looseness or corrosion
Bunks for worn carpet, cracks, or loose brackets
Motors and gearboxes for unusual sound or vibration
Electrical cords and switches for damage
Frame members for bends, cracks, or shifting
Canopy fabric and frame for tears or loose supports
Replace damaged cables or critical hardware before using the lift again. A cable that shows broken strands or severe corrosion is not something to “watch for a while.” It is a warning sign.
Keep the lift clean
Cleaning is more than cosmetic. Dirt, algae, leaves, fishing line, and sand can interfere with moving parts. Rinse the lift with fresh water when possible, especially after exposure to saltwater or dirty water.
For general cleaning:
Lower the cradle enough to access key parts safely.
Rinse frame members, bunks, pulleys, and exposed hardware.
Remove weeds, ropes, leaves, and debris.
Clean algae from bunks and guides.
Let parts dry when practical before covering or storing.
Avoid harsh chemicals that can damage protective coatings, bunk carpet, or nearby water quality. Mild soap and fresh water usually do the job.
Lubricate moving parts only where recommended
Some lift parts need lubrication, while others do not. Follow the manufacturer’s guidance. Using the wrong lubricant can attract grit or damage certain components.
Common lubrication points may include:
Grease fittings
Bearings
Gear assemblies
Winch components
Pivot points
Do not lubricate cables unless the manufacturer recommends it. Some cable materials and coatings require specific care.
Protect electrical components
Electric lifts should be treated with extra caution. Water and electricity require proper installation and careful inspection.
Keep control boxes closed and weather-protected. Look for cracked conduit, loose connections, damaged cords, and tripped protection devices. If the motor hums, trips a breaker, or runs inconsistently, stop using the lift until the cause is found.
Electrical repairs around docks should be handled by someone qualified to work with marine or waterfront systems. This is not a good place for guesswork.

Watch for common problems and fix them early
Most lift issues give warning signs before they turn into failures. Pay attention to changes in sound, speed, alignment, and motion. If the lift suddenly feels different, there is usually a reason.
Common issue | Likely cause | Practical troubleshooting step |
Boat sits unevenly | Lift is out of level, bunks are misaligned, or cable tension is uneven | Lower the boat, check frame level, inspect bunk placement, and compare cable positions |
Lift makes grinding or squealing sounds | Worn pulley, dry bearing, debris, or gearbox issue | Stop operation, inspect moving parts, clean debris, and lubricate approved points |
Motor runs but lift does not move well | Slipping drive part, cable problem, overloaded lift, or mechanical binding | Remove excess load, inspect cables and drive parts, and call for service if motion stays weak |
Cable winds unevenly | Misalignment, wrong tension, damaged cable, or off-level frame | Do not keep cycling the lift. Rewind correctly and inspect for cable damage |
Lift moves slowly | Low voltage, motor wear, binding parts, or heavy load | Check for obstructions, verify the boat weight, and have electrical supply checked |
Cradle will not lower smoothly | Cable twist, pulley issue, corrosion, or uneven load | Inspect cables and pulleys before forcing the lift down |
Excessive sway | Loose bracing, weak dock support, wave exposure, or poor footing | Tighten hardware, inspect supports, and consider added bracing if conditions demand it |
Uneven lifting needs quick attention
If one corner rises faster than the others, stop. Uneven movement can overload a cable or twist the frame. Check whether a cable has jumped a pulley, wrapped incorrectly on the drum, or developed slack.
Do not try to “correct” a badly uneven lift by running it through multiple cycles under load. Lower the boat if it is safe to do so, then inspect the system.
Rust and corrosion should be managed early
Galvanized and aluminum parts resist corrosion, but no lift is immune. Saltwater, brackish water, and stray electrical current can speed up damage.
Look for bubbling coatings, orange rust, white powdery corrosion on aluminum, and fasteners that no longer tighten properly. Replace compromised hardware with parts approved for the lift. Mixing the wrong metals can increase corrosion in wet environments.
Noise is a warning sign
A lift that suddenly squeals, pops, grinds, or bangs needs inspection. The cause may be minor, such as debris in a pulley, but it can also point to cable wear, bearing failure, or a damaged drive part.
Listen during both raising and lowering. Some issues appear only under load.
Prepare for storms, storage, and long-term use
Good maintenance includes what happens when the lift is not in normal use. Storms, freezing weather, and long idle periods can damage a lift even when the boat is off the water.
Before severe weather, follow local guidance and manufacturer instructions. In many cases, the safest position depends on the lift type, dock design, water level, and storm exposure. Remove loose items, secure the canopy if designed to stay in place, and avoid leaving the boat on a lift if high winds or major surge are expected.
For seasonal storage in cold-weather regions, clean the lift before winter. Remove the boat, lower tension where recommended, disconnect power safely, and protect motors and controls from moisture. If the lift is removable, store it on stable ground and support it so the frame does not bend.
At the start of the next season, do not assume everything is ready. Inspect first, then cycle the lift empty. Watch for smooth movement, even cable travel, and normal motor sound. After that, test with the boat while staying alert for alignment issues.

A lasting lift comes from steady care
A boat lift does its job quietly, which makes it easy to ignore until something goes wrong. The best approach is simple: choose the right site, install the frame square and level, support the hull correctly, and keep a steady inspection routine.
Focus on the parts that carry load and create motion. Cables, pulleys, bunks, bolts, motors, and electrical components deserve regular attention. Clean away debris. Rinse after harsh exposure. Fix uneven movement, strange noise, and corrosion before they spread.
When in doubt, stop using the lift and inspect it before cycling again. A careful pause is far better than forcing a loaded lift through a problem. With proper installation and consistent maintenance, a boat lift can protect the boat, make every launch easier, and deliver reliable service season after season.


